Showing posts with label DIY. Show all posts

March 26, 2012

Spring Wreath and Decor...

I decided to make another yarn wreath for the spring time. I used the same technique as the Valentine's Day Wreath. I wanted to try a "grassy" green one but found great green yarn on clearance at Jo-Ann Fabrics and went with the cheap stuff!
Materials you need to create your own yarn wreath:
     *Yarn
     *Wreath (any kind,I used the straw one in this project)
     *Hot glue gun
     *Felt in a variety of colors
     *Scissors
I wrapped the yarn around the straw wreath (keep the plastic on the wreath makes it easier to wrap the yarn around) and tied off the end. (Not sure why I had the Peacock feather laying there!)


I created a variety of flowers out of felt, using the same technique as I did for the Valentine's Day wreath, and hot glued them on.


I hung the wreath above the shelves and added some greens in tin cans that I bought at Ikea, birds that I used on the Valentine's Day Shelves, Spring banner from Target, Page out of a magazine and placed it in a yellow frame that I already had, and added some old bunnies that I had on hand.


This weather has been gorgeous here... makes it feel like summer instead of spring.


Enjoy!
  ~Amy

March 19, 2012

Fabric Covered Letters

I had a ton of the yellow chevron fabric left from the frame project I created a few weeks ago. I think I may use some to create some flowers for my spring wreath I have been working on, but I also knew I wanted to create something else for the shelf ledge in the dining room.

FABRIC COVERED LETTERS

I picked up three letters that spell out the word EAT from Jo-Ann Fabrics.

I cut the fabric around each letter and used spray adhesive to attach the front of the letter to each piece of fabric.

I hot glued the other pieces to cover the side and back of each letter.

The letters are just leaning on the ledge.
I have been working on a ton of different projects over the weekend. I got to finish the stripes in the hallway, worked on decorating my spring shelves in the living room, a new spring wreath, and got out our Easter decor. My oldest one still thinks she is getting a new swing set from the Easter Bunny.
What did you get done this weekend?
Isn't the weather awesome? It is going to be so nice to be off two days this week.
Enjoy!
  ~Amy

March 13, 2012

Downstairs Bathroom Progress...

We have been working on the downstairs bathroom for a while now. Lets take a look back at what it used to look like:
 This is the old vanity and toilet. We ripped off the countertop and threw it away. We also threw the old toilet away.


 Old light and wallpaper.... really makes you feel ill how ugly it is. Note- not really sure why the toilet brush is laying on top of the toilet????


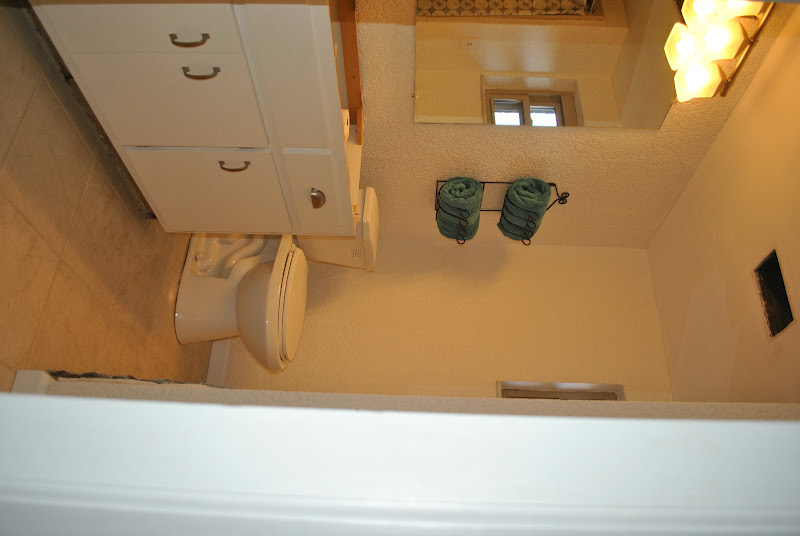
We refinished the cabinet and installed a new toilet into the space. I just sanded the cabinet down and then applied three coats of Zinsser primer- Perma-White Mold and Mildew proof. I coated the cabinet with three coats of white bath paint off the shelf color from Home Depot. I don't remember the name of the paint and already threw the can away.
The hardware is brushed nickel- Martha Stewart brand.

You can see the swatches  on the top of what countertop color we are thinking of purchasing.
We also added a towel holder we already owned to the wall.

We are keeping the existing shower- just going to replace the shower head.


Still have to:
     *Find a bathroom rug I like
     *Window Treatment
     *Trim under the vanity
     *New countertop, sink, and faucet
     *New vent cover for the ceiling vent cover
     *Trim down bathroom door and rehang
     *Trim in between the carpet and ceramic tile
     *Trim around the mirror


Guess everything takes time. Speaking of time, I don't know how much more time I can work on these stripes. Hopefully, the stripe walls will be done by Friday.
Enjoy!
  ~Amy


(You can't really tell by the pictures, but we also laid new ceramic flooring. We had to ripe out the old stuff which took forever.)

March 12, 2012

Chalkboard Vase

I wanted to spruce up an existing vase that I already had. I had some chalkboard paint laying around and figured on using what I had on hand already.

First, I washed the vase and taped off the edges (using a level to make sure the tape was even) to make a nice square on the glass front.
I used a paintbrush I already had on hand and painted the inside of the square. I think spray paint would have worked better, but I didn't have any.
Applied three light coats, allowing drying time in between.
Here is the finished project with a few tulips inside. I love the smell of flowers, they are cheap, and are a natural way to make your house smell so good!


Now tell me again, how do you keep Tulips alive? I have a lot of little projects to show you as I continue to work on the striped walls. Ran out of painter's tape again!
What did you do this weekend?
Enjoy!
  ~Amy

March 5, 2012

Stripes have Appeared!

Finally, we have stripes on the hallway walls. I only got two walls completed, because I wanted to make sure it looked good before I painted them all. I am not going to lie, this was very time consuming! I will get into how to make stripes on the walls in a second, but for now here they are- ta-da!


To make stripes on the walls, you have to first determine how many stripes you want and if you want an odd number or even number of stripes.
I measured from the floor to the ceiling and divided that number by the number of stripes I wanted. It came to be a little over 7 inches.
I rounded down to 7 inches and left the remaining measurement for the bottom stripe. You can't tell that one is bigger.
So I measured 7 inches down from the ceiling and made an X with my pen:
Then, I set up the laser level. I am in love with the level- it is awesome! Why didn't I purchase one before? I placed the level on the X that was marked on that wall:
I then remeasured with my tape measure to make sure the red laser line was 7 inches down. I then placed a piece of painter's tape on the line and then remeasure again to make sure it was 7 inches. I kept doing this unto the wall was completed. I then moved to the second wall and followed these steps again.
I placed a piece of tape on the stripe I wanted painted so I didn't forget which stripe was to be white.
I painted two coats of off the shelf white from Behr in Eggshell. I allowed 24 hours before applying the second coat. I did not have any problems when I riped the tape off of paint bleeding under the tape.

See all of the tape that I used.... A LOT...................... 
It was finally completed after six hours of working off and on.
I only have three more walls to complete, hopefully, I can get them done this week after work!

What did you get done this weekend? Did you organize a drawer or closet? Did you paint an end table? Doesn't it feel so good to get projects completed?
Enjoy!
  ~Amy